
Deploy Vue App with DeployHQ
DeployHQ makes it straightforward to deploy Vue 3 applications built with Vite, handling your build pipeline and file transfers automatically on every push to your repository. Whether you're deploying a single-page app to a simple web server or managing multiple environments with different configuration, DeployHQ keeps your deployment process consistent and repeatable.
This guide walks through setting up a complete deployment pipeline for a Vue 3 application, from creating your project to running your first deployment.
Deploying with DeployHQ
Create a project
Start by creating a new project in DeployHQ and connecting it to your repository. DeployHQ supports GitHub, GitLab, Bitbucket, and self-hosted Git servers.
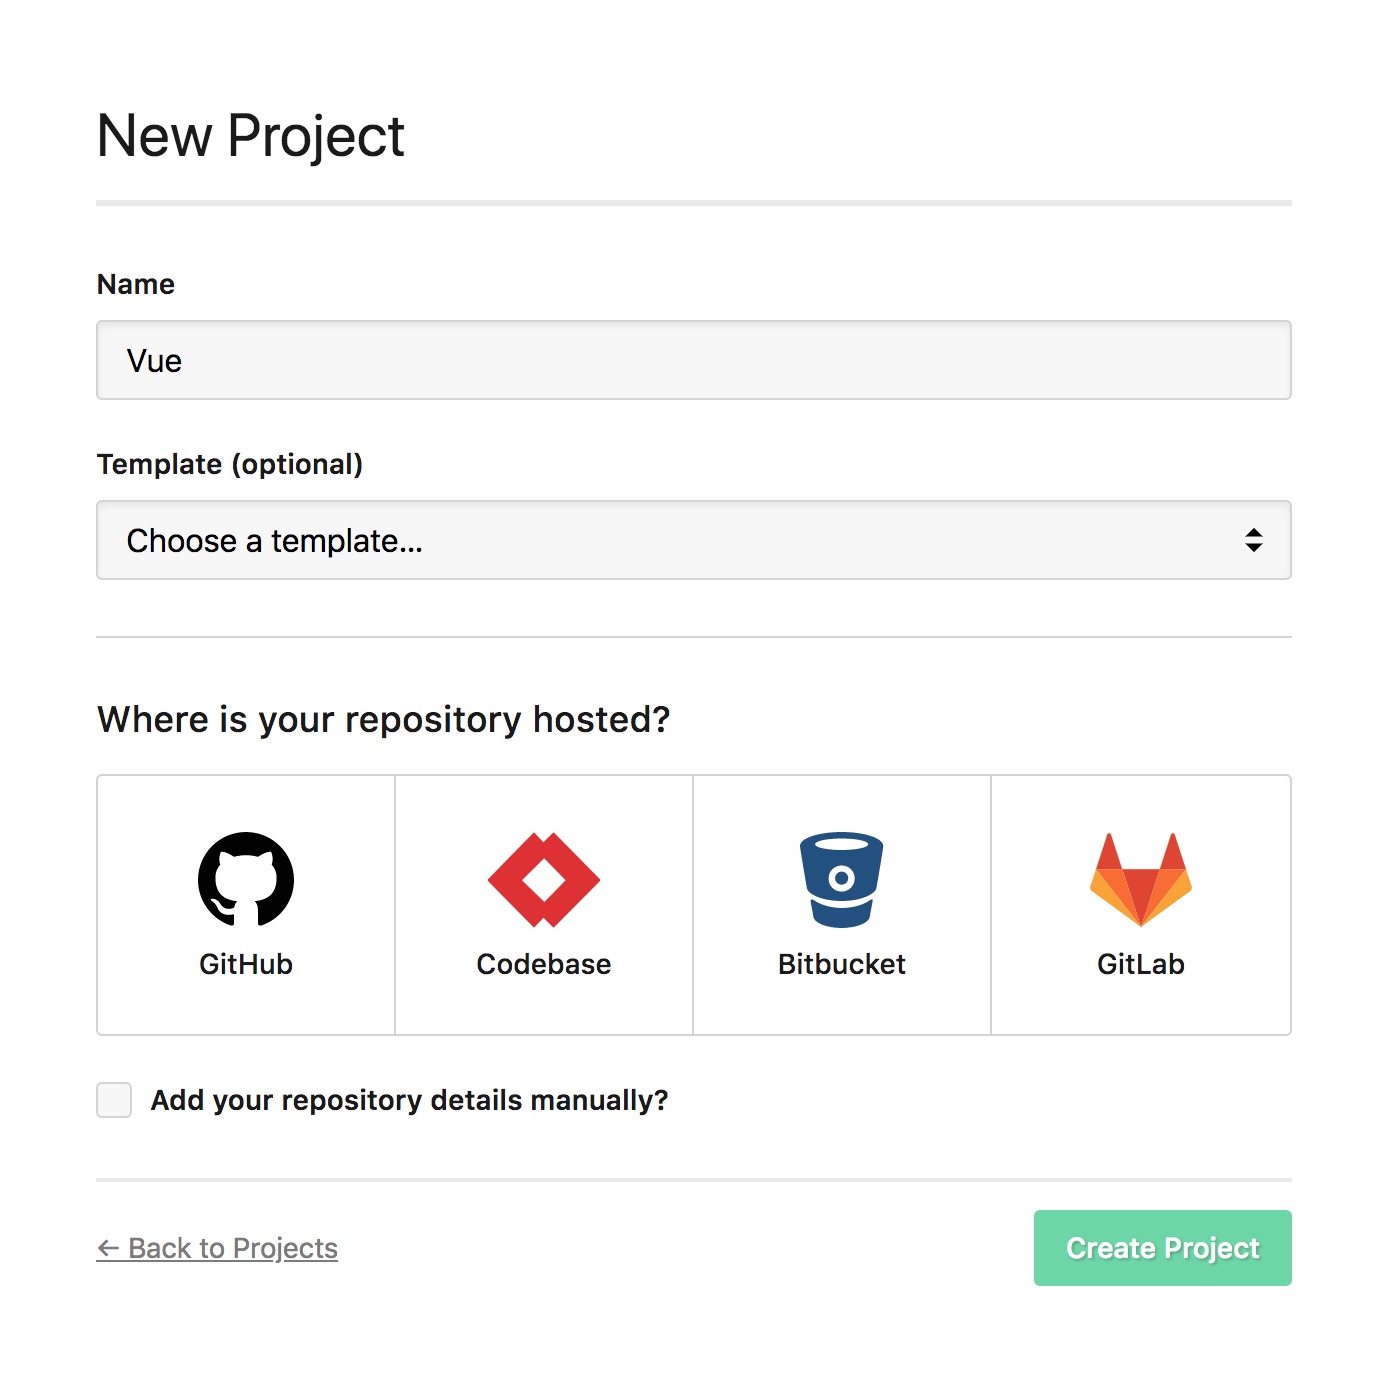
If you need help connecting your repository, see (Article: #7).
Once your project is created, DeployHQ will automatically detect your repository branches.
Create a deployment user on your server
For SSH deployments, it's good practice to create a dedicated system user for DeployHQ rather than deploying as root or your personal account. This limits what DeployHQ can access on your server and makes it easier to audit deployments.
On your server, create a new user:
sudo adduser deployhq
Add the user to the www-data group (or whichever group your web server uses) so it can write to the web root:
sudo usermod -aG www-data deployhq
Set appropriate permissions on your deployment directory:
sudo chown -R deployhq:www-data /var/www/your-app
sudo chmod -R 755 /var/www/your-app
Configure a server
Add a new server to your DeployHQ project. For most Vue deployments you'll use SSH/SFTP, which allows DeployHQ to transfer your built files securely and run post-deployment commands.
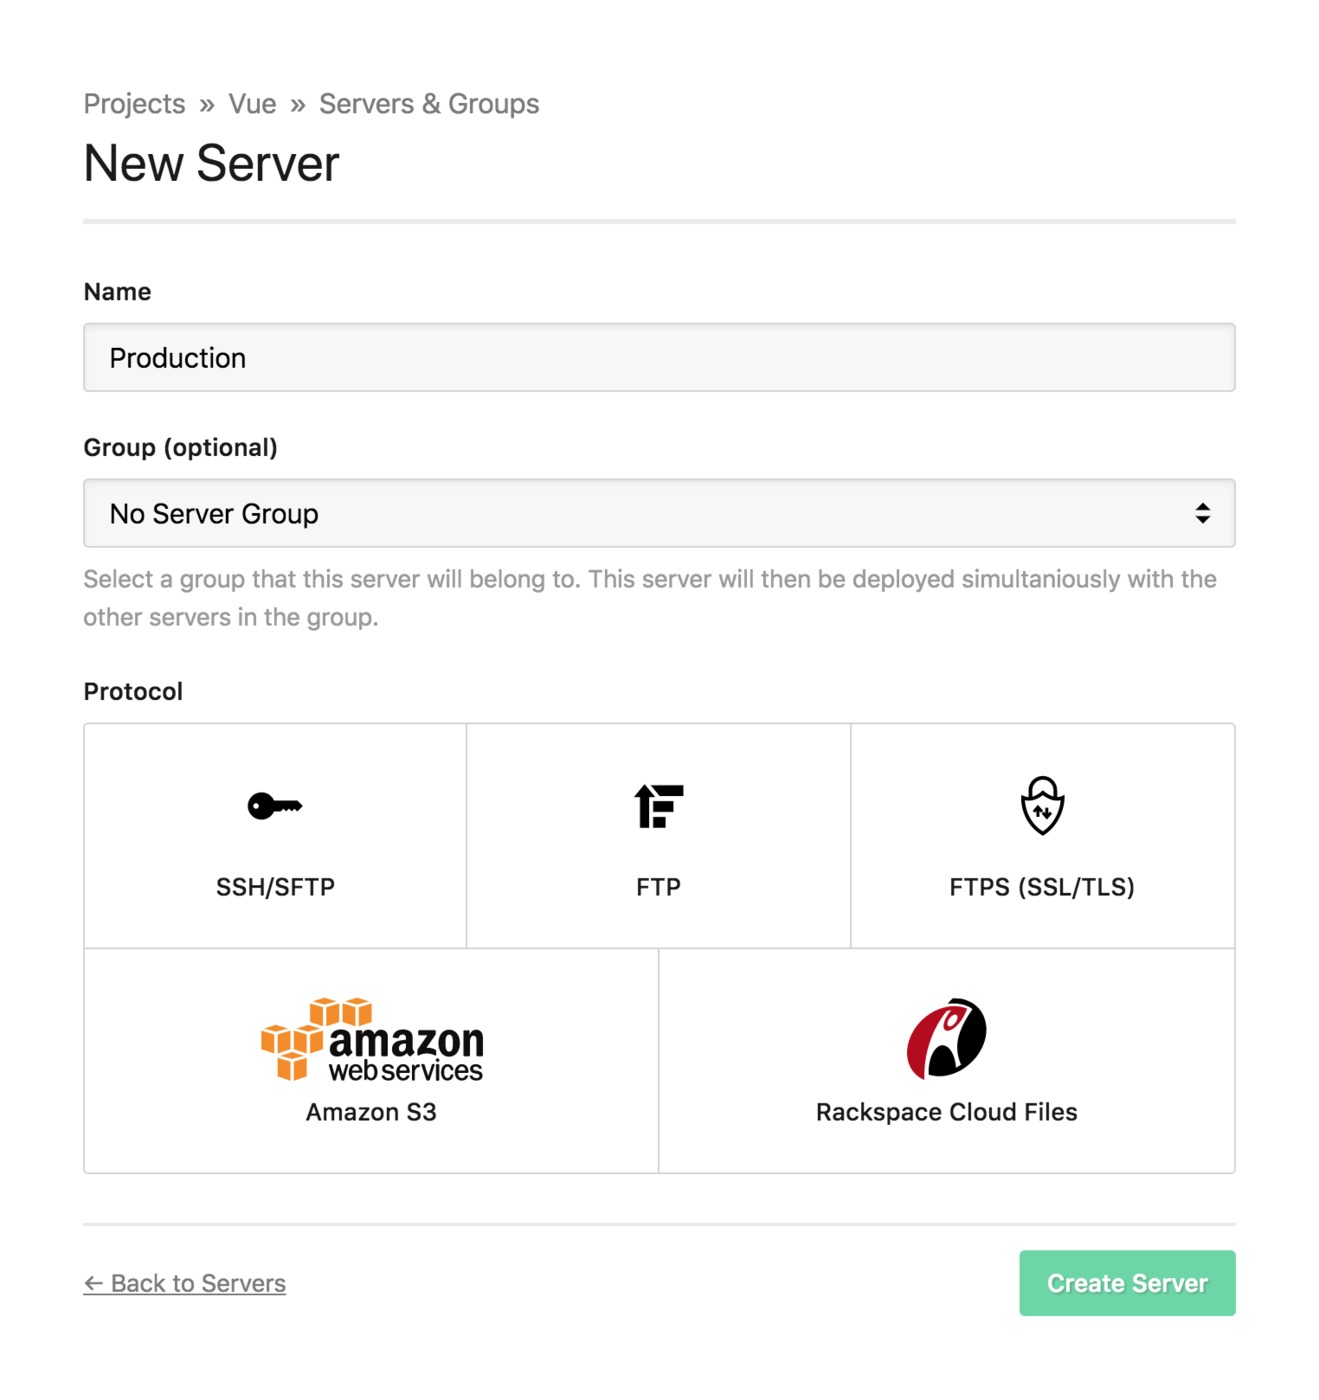
Connection settings:
- Protocol: SSH/SFTP (see (Article: #29) for full SSH configuration details)
- Hostname: Your server's IP address or domain
- Username:
deployhq(the user you created above) - Authentication: SSH key (recommended over password)
To use SSH key authentication, copy the public key shown in DeployHQ and add it to /home/deployhq/.ssh/authorized_keys on your server:
sudo mkdir -p /home/deployhq/.ssh
sudo nano /home/deployhq/.ssh/authorized_keys
# Paste the DeployHQ public key, save and exit
sudo chmod 700 /home/deployhq/.ssh
sudo chmod 600 /home/deployhq/.ssh/authorized_keys
sudo chown -R deployhq:deployhq /home/deployhq/.ssh
Deployment path: Set the deployment path to your web root, for example /var/www/your-app.
For zero-downtime deployments, see (Article: #297) — DeployHQ supports atomic deployments that swap directories only after a successful build and transfer.
If you're using FTP or FTPS instead of SSH, see (Article: #31) and (Article: #33) respectively. For S3 deployments, see (Article: #35).
If you run into connection issues, (Article: #27) covers common server configuration problems.
Configure the build pipeline
Vue 3 projects created with npm create vue@latest use Vite, which provides fast builds optimised for production.
In your DeployHQ project settings, navigate to Build Pipeline and configure the following:
Node.js version: Vue 3 with Vite requires Node.js 18 or later. Set your Node version to 18 or 20 in the build environment settings.
Install dependencies:
npm ci
Using npm ci rather than npm install ensures a clean, reproducible install based on your package-lock.json.
Build command:
npm run build
Vite compiles your Vue application, processes assets, and outputs optimised production files to the dist directory.
Cache node_modules: Enable caching for node_modules/** in the build settings. This significantly speeds up subsequent deployments by reusing previously downloaded packages rather than fetching them from npm on every deploy.
Deployment subdirectory: Set the deployment subdirectory to dist so DeployHQ only transfers your compiled output to the server, not your source files or node_modules.
Config files
Vue 3 with Vite uses .env files for environment variables. Variables prefixed with VITE_ are exposed to your client-side code at build time:
VITE_API_URL=https://api.example.com
VITE_APP_TITLE=My App
These values are baked into the compiled JavaScript during the build step, not read at runtime. This means you need the correct environment variables present before running npm run build.
DeployHQ's Config Files feature lets you manage environment-specific .env files and deploy them to your build environment automatically. Create a config file at .env (or .env.production) in DeployHQ's config files section, and DeployHQ will write it before your build commands run. This keeps sensitive API keys and environment-specific values out of your repository.
Configure nginx for Vue Router
If your Vue application uses Vue Router in history mode (using createWebHistory), your server needs to be configured to serve index.html for all routes. Without this, navigating directly to a URL like https://example.com/about will return a 404 because the file doesn't exist on disk — only the browser-side router knows what to render.
Add the following to your nginx server block:
server {
    listen 80;
    server_name example.com;
    root /var/www/your-app;
    index index.html;

    location / {
        try_files $uri $uri/ /index.html;
    }
}
The try_files directive tells nginx to serve the actual file if it exists (for assets like CSS, JS, and images), and fall back to index.html for everything else, allowing Vue Router to handle the route.
After updating your nginx config, reload it:
sudo nginx -t && sudo systemctl reload nginx
If you're using hash mode (createWebHashHistory) instead of history mode, this configuration is not required.
Test your production build locally
Before deploying, you can verify your production build works as expected using Vite's built-in preview server:
npm run build
npm run preview
This serves the contents of dist locally, giving you a close approximation of what your users will see in production. It's useful for catching issues with asset paths, environment variable substitution, and routing before they reach your server.
Deploy
With your project, server, and build pipeline configured, you're ready to run your first deployment.
Trigger a deployment from the DeployHQ dashboard by selecting your branch and clicking Deploy. DeployHQ will:
- Clone your repository at the selected revision
- Write any config files you've defined
- Install dependencies with
npm ci - Run
npm run build - Transfer the contents of
distto your server - Run any post-deployment SSH commands you've configured
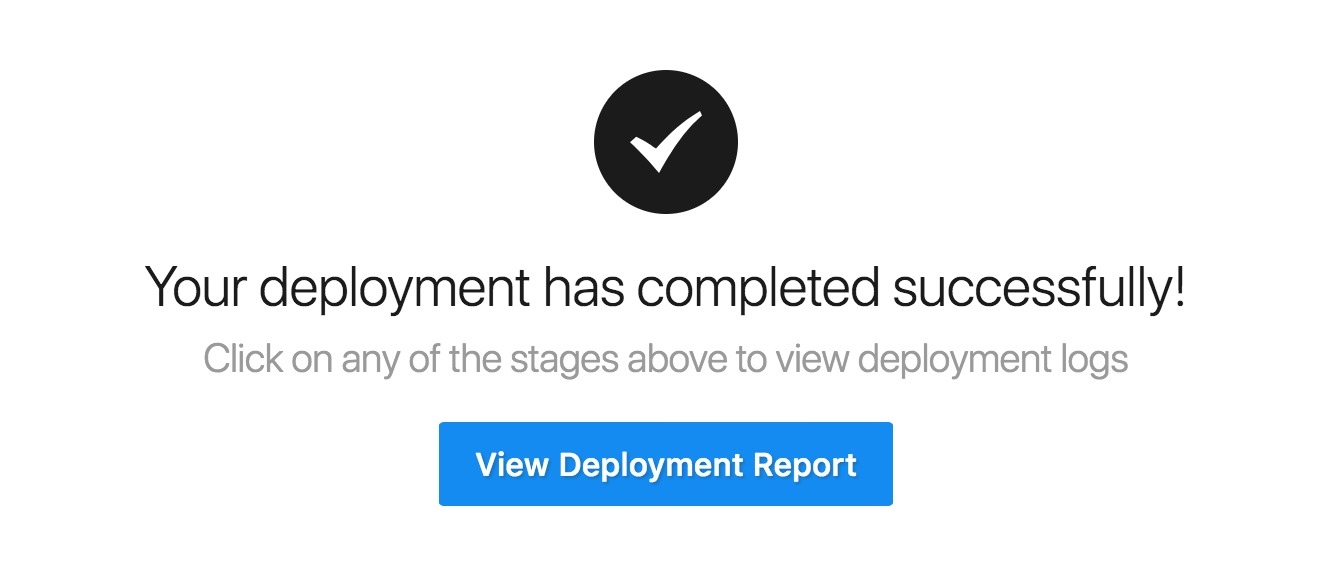
Once the deployment completes, your Vue application will be live. Future pushes to your configured branch can trigger deployments automatically via the webhook DeployHQ sets up in your repository.
A note on Nuxt.js
If you're building a server-side rendered Vue application with Nuxt.js, the deployment approach differs from a standard Vite SPA. Nuxt SSR requires a Node.js server process running on your server — you can't simply deploy static files. You'll need to build with npm run build, transfer the output directory, and manage a persistent Node process (typically with PM2 or a systemd service).
Nuxt also supports static site generation (nuxt generate), which outputs a fully static site that can be deployed the same way as a standard Vue SPA. Check your Nuxt configuration to determine which mode your application uses.
For more deployment guides covering other frameworks and platforms, visit our guides library.